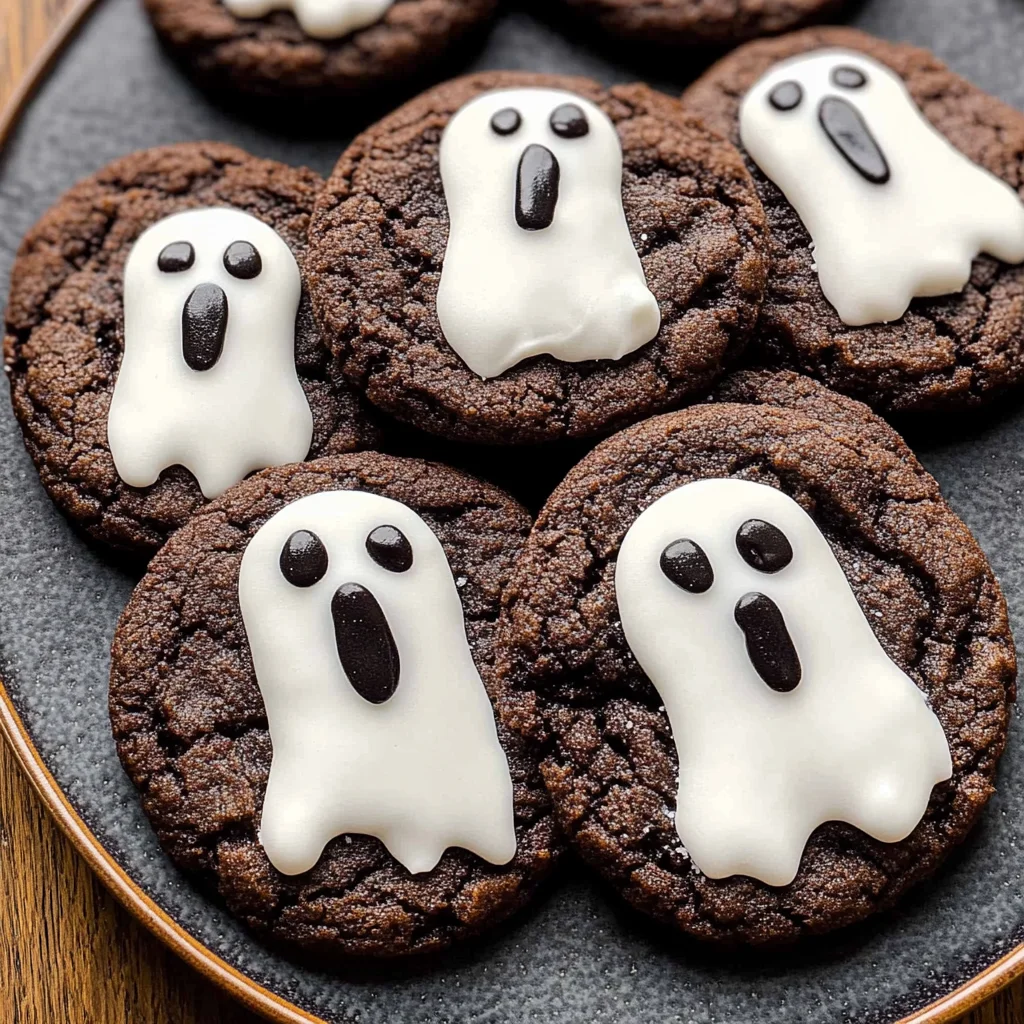
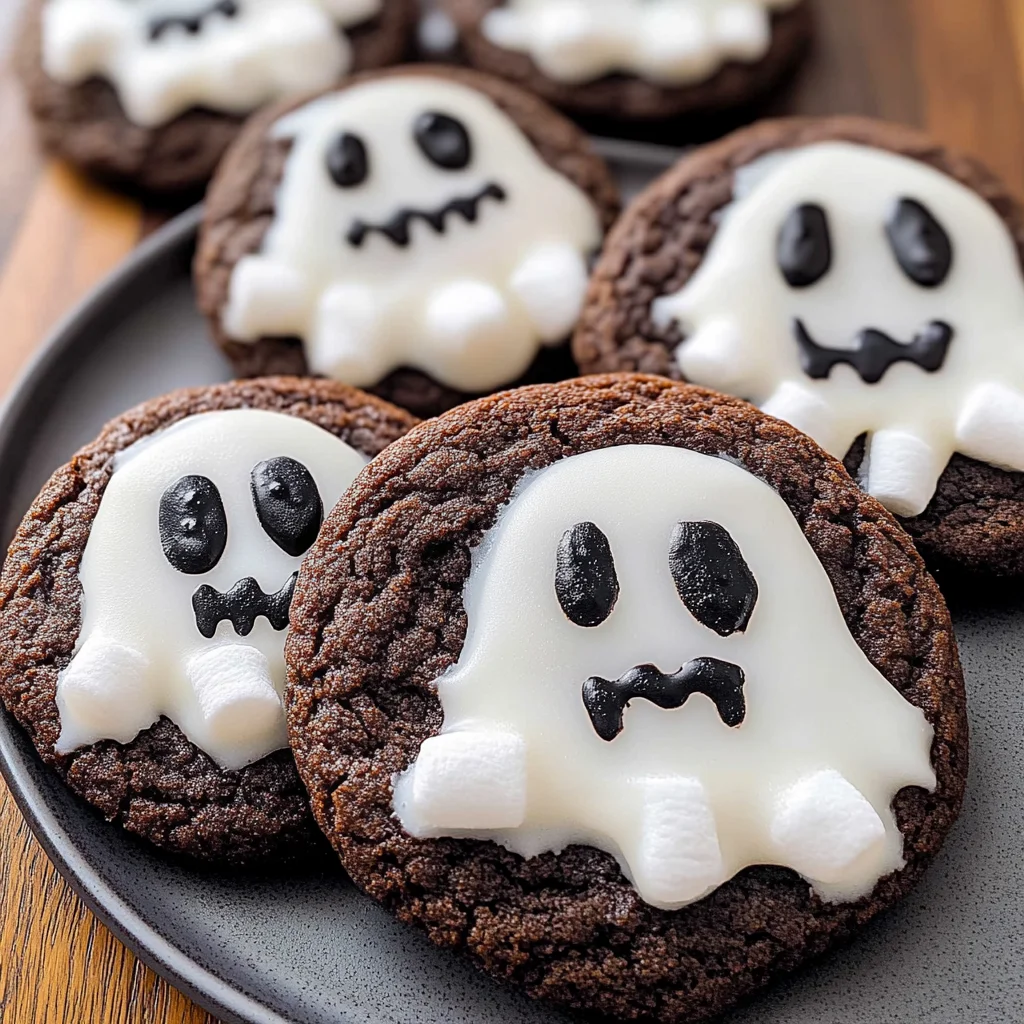
Ghost cookies are the perfect spooky treat for Halloween! With their fun and festive appearance, these cookies are not only easy to make but also a hit at any Halloween gathering. Whether you’re hosting a party, attending a potluck, or simply celebrating the season with your family, ghost cookies add a delightful touch of creativity and sweetness. Their charming look and simple preparation make them an ideal choice for bakers of all skill levels.

Jump to:
- Why You’ll Love This Recipe
- Tools and Preparation
- Essential Tools and Equipment
- Importance of Each Tool
- Ingredients
- For the Icing
- For the Cookies
- For the Decoration
- How to Make Ghost cookies
- Step 1: Prepare Your Workspace
- Step 2: Make the Icing
- Step 3: Decorate the Cookies
- Step 4: Create Ghost Faces
- How to Serve Ghost cookies
- Display on a Festive Platter
- Pair with Milk or Hot Chocolate
- Use as Party Favors
- Create a Dessert Table
- How to Perfect Ghost cookies
- Best Side Dishes for Ghost cookies
- Common Mistakes to Avoid
- Storage & Reheating Instructions
- Refrigerator Storage
- Freezing Ghost cookies
- Reheating Ghost cookies
- Frequently Asked Questions
- What are Ghost cookies?
- How long do Ghost cookies last?
- Can I customize my Ghost cookie decorations?
- What should I serve with Ghost cookies?
- Final Thoughts
- 📖 Recipe Card
Why You’ll Love This Recipe
- Quick and Easy: With just a few simple ingredients, you can whip up these ghost cookies in no time.
- Fun for Everyone: Kids and adults alike will enjoy decorating these spooky treats together.
- Versatile Treats: Perfect for Halloween parties, school events, or as a festive gift for friends.
- Delicious Flavor: The combination of chocolate chunk cookies and sweet icing creates a delightful taste that everyone will love.
- Creative Decorating: Use your imagination to customize the ghost faces with black writing icing.
Tools and Preparation
Making ghost cookies requires minimal tools, making it accessible for anyone to try. Gather your supplies for an enjoyable baking experience.
Essential Tools and Equipment
- Baking sheet
- Parchment paper
- Mixing bowl
- Spatula
- Measuring scales
Importance of Each Tool
- Baking sheet: Essential for evenly baking your cookies without burning them.
- Parchment paper: Provides a non-stick surface that makes transferring the cookies easy.
- Mixing bowl: Necessary for combining your icing sugar and other ingredients smoothly.
Ingredients
For the Icing
- 175g icing sugar
For the Cookies
- 1 x 200g pack chocolate chunk cookies
For the Decoration
- 9 marshmallows (regular size)
- black writing icing
How to Make Ghost cookies
Step 1: Prepare Your Workspace
Start by preheating your workspace to create an organized setting. Gather all necessary ingredients and tools.
Step 2: Make the Icing
- In a mixing bowl, sift the 175g icing sugar.
- Add water gradually until you reach a smooth consistency.
Step 3: Decorate the Cookies
- Place each chocolate chunk cookie on the baking sheet lined with parchment paper.
- Apply a generous amount of icing on top of each cookie.
- Add one marshmallow on top of each iced cookie as a ghost head.
Step 4: Create Ghost Faces
- Using black writing icing, draw eyes and mouths on each marshmallow to give them personality.
- Let the decorated cookies set for about 10 minutes before serving or storing.
Enjoy your spooky ghost cookies as they bring joy to your Halloween celebrations!
How to Serve Ghost cookies
Ghost cookies are a fun and festive treat perfect for Halloween parties or gatherings. These spooky delights can be presented in various ways to enhance their charm and make your dessert table stand out.
Display on a Festive Platter
- Arrange the ghost cookies on a colorful Halloween-themed platter for a striking visual effect. Adding some fake spider webs or plastic spiders can amplify the spooky vibe.
Pair with Milk or Hot Chocolate
- Serve these delicious ghost cookies alongside a cold glass of milk or warm hot chocolate. The richness of the drinks complements the sweetness of the cookies perfectly.
Use as Party Favors
- Wrap individual ghost cookies in clear bags tied with orange or black ribbons. These make adorable party favors that guests will love to take home.
Create a Dessert Table
- Include ghost cookies as part of a larger dessert table filled with Halloween treats. Incorporate other themed items like pumpkin cupcakes and witch hat brownies for variety.
How to Perfect Ghost cookies
To ensure your ghost cookies turn out perfectly every time, follow these simple tips that will elevate your baking game.
- Use fresh ingredients: Ensure all ingredients, especially marshmallows, are fresh for the best flavor and texture.
- Chill the cookies: For a firmer texture, consider chilling the chocolate chunk cookies before decorating them.
- Pipe with precision: When using black writing icing, practice piping techniques on parchment paper first to avoid mistakes on your cookies.
- Make it spooky: Feel free to add edible glitter or sprinkles to give your ghost cookies an extra touch of fun and festivity.
Best Side Dishes for Ghost cookies
If you’re looking to serve something alongside your ghost cookies, consider these delightful side dishes that complement their sweet flavor beautifully.
- Pumpkin Spice Latte: A warm drink that pairs perfectly with the sweetness of ghost cookies.
- Caramel Apple Slices: Crunchy apple slices dipped in caramel provide a refreshing contrast.
- Witch’s Brew Punch: A vibrant green punch can add a festive touch to your dessert spread.
- Chocolate-Covered Pretzels: Salty and sweet, these add a nice crunch next to soft ghost cookies.
- Candy Corn Mix: A colorful mix of candy corn and nuts provides a fun snack option that’s easy to grab.
- Spider Web Cheese Ball: A savory addition that contrasts well with sweet treats; serve it with crackers for easy snacking.
Common Mistakes to Avoid
Making ghost cookies can be a delightful experience, but there are common pitfalls to watch for.
- Ignoring ingredient measurements: Always measure your ingredients accurately. A slight variation can affect the texture and flavor of your ghost cookies.
- Not letting cookies cool: If you don’t allow your cookies to cool before decorating, the icing may melt and ruin the spooky design. Patience is key!
- Using stale marshmallows: Ensure your marshmallows are fresh for maximum fluffiness. Stale marshmallows will not hold their shape during baking.
- Overdecorating: While it’s tempting to go all out, too much decoration can make them look cluttered. Keep it simple for a more charming appearance.
- Skipping quality chocolate cookies: Using low-quality cookies will dull the taste. Choose delicious chocolate chunk cookies for the best flavor.
Storage & Reheating Instructions
Refrigerator Storage
- Store ghost cookies in an airtight container.
- They will stay fresh for up to 5 days in the refrigerator.
Freezing Ghost cookies
- Place ghost cookies in a single layer on a baking sheet before freezing.
- Once frozen, transfer them to a freezer-safe container or bag. They can last up to 2 months in the freezer.
Reheating Ghost cookies
- Oven: Preheat to 350°F (175°C) and warm for about 5 minutes for a fresh-baked taste.
- Microwave: Heat individually for about 10-15 seconds for a quick fix; don’t overdo it!
- Stovetop: Use a skillet over low heat, covering with a lid for about 2-3 minutes to warm evenly.
Frequently Asked Questions
If you have questions about making ghost cookies, we’ve got you covered!
What are Ghost cookies?
Ghost cookies are fun Halloween treats made from chocolate chunk cookies decorated with marshmallows and icing to resemble spooky ghosts.
How long do Ghost cookies last?
Ghost cookies can last up to 5 days in the refrigerator or up to 2 months when properly frozen.
Can I customize my Ghost cookie decorations?
Absolutely! You can use different colors of icing or add candy eyes for extra personality. Get creative!
What should I serve with Ghost cookies?
Pair these Halloween treats with milk, hot cocoa, or even spiced cider for a cozy snack option.
Final Thoughts
These ghost cookies are not only easy to make but also versatile enough for any Halloween gathering. You can customize them based on your preferences and create various spooky designs. Don’t hesitate to try this fun recipe with friends and family!
Did You Enjoy Making This Recipe? Please rate this recipe with ⭐⭐⭐⭐⭐ or leave a comment.
📖 Recipe Card
Print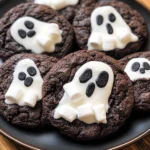
Ghost Cookies
- Total Time: 15 minutes
- Yield: Makes approximately 9 ghost cookies 1x
Description
Ghost cookies are the ultimate Halloween treat that combines creativity and deliciousness in every bite! These charming cookies, topped with fluffy marshmallow ghosts and sweet icing, are sure to delight kids and adults alike. Perfect for parties, potlucks, or family gatherings, they are not only fun to make but also a joy to decorate. With just a few simple ingredients and straightforward steps, you can create these spooky delights that add a festive flair to your Halloween celebrations. Gather your loved ones and enjoy the process of making these delightful ghost cookies together!
Ingredients
- 1 pack (200g) chocolate chunk cookies
- 175g icing sugar
- 9 regular-sized marshmallows
- Black writing icing
Instructions
- Preheat your workspace and gather all ingredients.
- In a mixing bowl, sift the icing sugar and gradually add water until smooth.
- Place each chocolate chunk cookie on a lined baking sheet. Spread icing on top and place one marshmallow on each cookie as a ghost head.
- Use black writing icing to draw faces on each marshmallow ghost.
- Let the decorated cookies set for about 10 minutes before serving.
- Prep Time: 15 minutes
- Cook Time: 0 minutes
- Category: Dessert
- Method: Baking
- Cuisine: Halloween Treat
Nutrition
- Serving Size: 1 cookie (approx. 30g)
- Calories: 130
- Sugar: 12g
- Sodium: 80mg
- Fat: 6g
- Saturated Fat: 3g
- Unsaturated Fat: 2g
- Trans Fat: 0g
- Carbohydrates: 18g
- Fiber: <1g
- Protein: 1g
- Cholesterol: 0mg